 More stereo upgrade installation guide
Although there is lots of space in the Prado there are not many ‘stealth’ setups you can create because of the amount of open space. More so by installing fixed audio equipment you’d be sacrificing usable flat luggage space. Eg. It would be quite obvious that it has a sub woofer or amplifier in the back cause there’s no where to hide. I didn’t want that anyway.
Level of difficulty
To upgrade the stereo and speakers has not been too difficult. The most difficult task was to create the new speaker bases and to work out the positive and negative terminals. Overall time it took to replace the lot probably worked out to about 6 hours for the complete installation again due to the cutting and getting materials and care with the wiring. It would probably be quicker if I had all the materials on hand.
 Best points about my setup
– Reasonably clear sound from any audio source.
– Not boomy or muddy.
– No visible audio upgrade apart from the Sony head unit.
– iPod iPhone and iPad connectivity for ANY old or future models.
– Plug in for 3.5mm any portable MP3 or video player.
– Immediately noticeable Hi-Fi sound.
– Plenty of options to add amplifer and sub woofer at a later stage.
Sound quality summary
Sound quality is subjective but to me the sound is so clear that I can tell the difference between a CD and a MP3. But more telling is that the difference between a poorly ripped MP3 and a good one is very obvious. Previously I couldn’t tell the difference without a concentrated effort to listen to the difference tracks.
 I have not installed a separate amplifier (yet) so relying on the Sony’s inbuilt amplifier. I think it is loud enough. Also considering I have used the standard speaker wiring it works out well. If I where to use a separate amplifier I would also need to use separate wiring to handle increased power output.
I did not replace the separate tweeters on top of the door panel since I haven’t found any I liked. I don’t think they improve the sound greatly so will deal with them later.
So the end result is much improved sound quality from the original system and much more flexibility to expand. Yes it was worth the effort. After hearing the difference between the standard system and my upgrade I would recommend it to anyone.
However so many tweeters means that vocals are are outstanding and there is proper bass – probably due to the low power in-built amplifier but the bass frequencies are bass and not muddy.
 Any issues?
There are one or two things I’d like to modify further is the additional of a sub-woofer. I think I’ve added too much mid range! While very pleased with the sound quality so far there is always room for additions and changes. Only because I have to use the EQ to adjust the sound further.
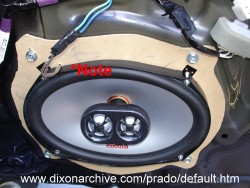
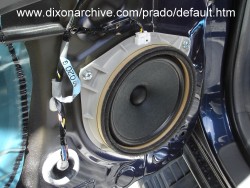
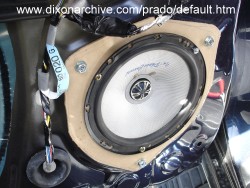
Since the front speaker mounting screws are an odd distance and the speaker hole its self is an odd shape so you will need to create a mounting base. Just trace the OEM door speaker shape on a thin piece of MFD and use a powered jigsaw to cut out the shape.
*Note on the finished product that I had to use a spacer to bring forward the 6×9 speaker by 1cm because the window would not go down fully. Simply get a thinner speaker if you don’t want to get an additional spacer. Also I kept the standard OEM separate tweeters on top of the front door panel.
Toyota LandCruiser Prado stereo upgrade – Part 1
Toyota LandCruiser Prado stereo upgrade – Part 2
Toyota LandCruiser Prado stereo upgrade – Part 3
Toyota LandCruiser Prado stereo upgrade – Part 4 – iPod/iPhone/iPad connectivity
Toyota LandCruiser Prado stereo upgrade – Part 5 – Speakers
Toyota LandCruiser Prado stereo upgrade – Part 6 – Conclusion


